Last update: 7 months ago
Ah, laundry day is here once more. Your clothes are looking fresh! With the temperatures dropping and winter on the horizon, you’re really getting the most out of your clothes dryer. It’s such a time-saver, letting you do multiple loads in a single day.
However, dryers are breeding grounds for bacteria. If you neglect to clean your dryer regularly, you’ll end up with filthy clothes and lint. This will compromise the dryer efficiency and overall home appliance care.
This article will teach you everything you need to know about dryer maintenance. We’ll give you step-by-step instructions on how to clean a dryer, including expert tips and best practices.
Do you really need to clean your dryer?
Cleaning your dryer and vent will shorten drying times. It will also keep your clothes in better condition. However, regular use can cause dust and lint to accumulate in your appliance, hindering its performance.
Actually, most dryer fires are caused by lint and dust, not wiring problems. Fires that begin from lint-clogged clothes dryer vents cause lots of home fire damage each year. So, Fire and Rescue Services in New South Wales recommend cleaning your lint filter before or after each use. It will ensure adequate airflow around your dryer. Regular maintenance can prevent dryer fires and keep your family safe.
Additionally, proper cleaning can increase energy efficiency and improve overall dryer performance. When booking deep cleaning, it will be included in the service.
How to clean your dryer inside and out?
Here’s how to clean your dryer inside and out. Everything from lint removal to vent cleaning.
Step 1. Prepare to clean your dryer
Here are some signs your dryer needs a deep clean:
- Your clothes are taking longer than usual to dry.
- There’s an unusual smell coming from your machine.
- Your laundry room feels more humid than usual when the dryer is running.
Are you ready to tackle the cleaning process? If yes, first ensure you follow proper dryer cleaning preparation and safety measures. Disconnect your dryer from the wall socket to prevent accidental operation while parts are removed. If your machine runs on gas, be sure to turn off the gas valve, close the gas supply line valve, and then disconnect and cap the supply line pipe.
Supplies you will need:
- Water and vinegar spray
- Detergent (soap)
- Nylon brush
- Rubbing alcohol
- Isopropyl alcohol
- Household bleach
- All-purpose cleaner
- WD-40
Tools you will need:
- Dryer cleaning brush
- Vacuum with hose (optional)
- Screwdriver
- Blow dryer
- Plastic spatula
- Old credit card (optional)
- Dryer sheets
- Microfiber cloth
- Protective eyewear
- Rubber gloves
- Rags
Here’s how to clean a dryer vent, lint trap, drum, and exterior with the supplies and tools listed above.
Step 2. Clean the lint trap
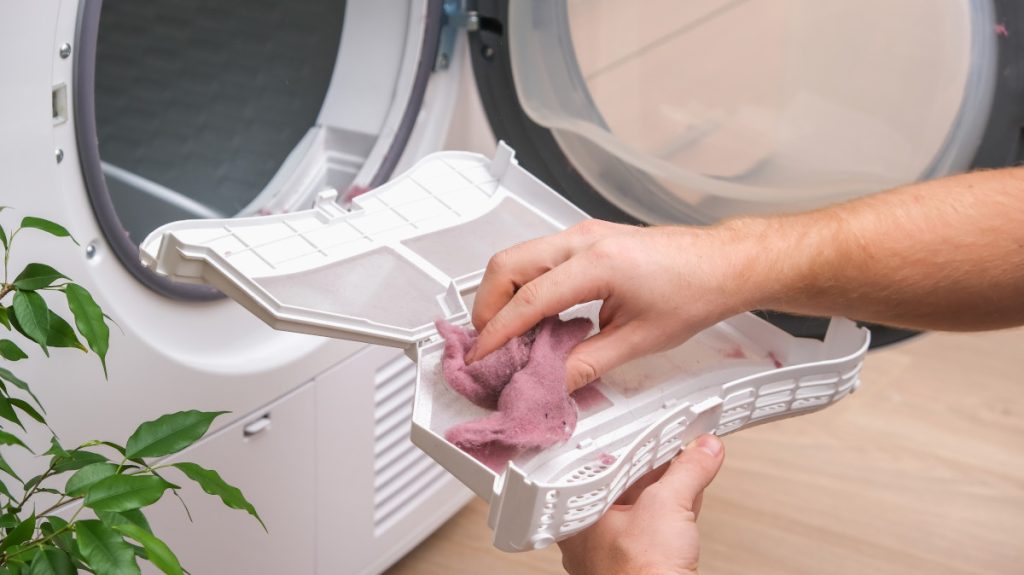
Your clothes shed fibres when you tumble them in the dryer. The lint trap captures these fibres to prevent them from obstructing the dryer vent hose. Since lint is highly flammable, just empty the lint trap before or after every cycle.
First, locate your lint trap. In front-loading dryers, it’s usually inside the door in front of the dryer drum. For top loaders, it is on top of the dryer near the controls. If you’re unsure, check your machine manual. Once found, follow these steps:
- Clean the lint screen – Do regularly to prevent fire hazards, especially with gas dryers. After every use, clean the lint screen. You can brush it or vacuum it with a narrow nozzle. Then, wipe it with a damp cloth. Let it fully dry before putting it back. For deeper cleaning, scrub with an old toothbrush and hot, soapy water.
- Clean the lint trap – Twist gently to clean the trap, repeating until it’s empty. Alternatively, use the crevice attachment on your vacuum cleaner to clear out lint. Wipe the trap and screen with a damp cloth. Let it dry before using the dryer again. For a deep clean, you can scrub it with detergent and hot water solution.
Step 3. Clean the exterior body of dryer
Dryers often collect residue from detergent drips, fabric softener, and lint. Use equal parts vinegar and water to clean these filthy surfaces. Wipe away any stubborn grime with a microfiber cloth. Lastly, spray the dryer’s surface and door to get rid of dust and fingerprints. Avoid spraying the knobs and buttons directly to prevent moisture from getting into inaccessible areas. Instead, spray the cleaner on the cloth and then wipe them down. The dryer is ready to use once the lint trap is reinserted and the power cord is connected.
Step 4. Clean the drum
The drum of the dryer is where you put your clothes to dry. Sometimes, dust and debris can accumulate inside. Moreover, dryer sheets and fabric softeners can leave a filmy residue on the drum over time, making cleaning inside your dryer a necessary part of your routine.
Vacuum the inside of the drum to remove any lingering dust or debris.
- For an electric dryer, clean the inside with a soft cloth dipped in warm water and dish soap.
- For a gas dryer, use a liquid, nonflammable household cleaner to clean the inside.
But sometimes, no matter how carefully you check everyone’s pockets, unexpected items can still end up in the dryer. Common culprits include pens, crayons, chewing gum, candy, and lipstick. You might also accidentally wash a dry-clean-only item, which can leave its dye clinging to the drum. These stains inside your dryer can transfer to other clothes and ruin them. Here’s how to clean the most common stains inside a dryer. And again, always work with an unplugged, shut-off dryer!
Crayon
Yes, it definitely sounds like a nightmare. But take a deep breath and begin by inspecting the drum for any stuck-on crayon pieces. Get a plastic spatula or an old credit card and scrape them off. Next, spray a small amount of WD-40 onto a soft cloth. Wipe the affected areas until the stain is removed. Avoid spraying WD-40 directly into the dryer. Wash the interior with warm, soapy water, paying extra attention to areas treated with WD-40. Finish by wiping the dryer drum with clean, dry cloths or running a load of dry cloths through a full drying cycle to remove any residue. Voalla!
Ink
This one is awful, as well. But there is a solution. First, empty the dryer and run it for 5–10 minutes to loosen the ink stains. Then, turn off and unplug the dryer. Use some rubbing alcohol to remove the ink stains. Make sure you change the rags as needed to keep the ink from getting everywhere. Follow up with a good rinse using a damp cloth. To check your work, run an old white towel through a dryer cycle. If it emerges clean, the ink stains are successfully eradicated. If not, repeat the process.
Dye
Wonder where that dye is from? If you have done some craft projects or got new jeans, it’s totally normal to have dye in the drum. To remove dye from your dryer, prepare old towels. Soak them in a solution of hot water and household bleach. Wear protective eyewear and rubber gloves! Then, wring the towels nearly dry and run the dryer with them for 30 minutes on an air-fluff setting. Repeat the process as much as necessary.
Candy or gum
Do you have kids? If the answer is yes, then it’s totally fine to have some forgotten, unwanted candy or gum in the drum. Here, similar to removing crayons, use a plastic spatula or rubber blade to scrape off as much gum or candy as possible. Then, use a blow dryer to soften. It will make their removal easier. Afterwards, scrub the affected area with an all-purpose cleaner and wipe it dry.
Melted wax
Won’t ask you where it came from. Now that it is there toss several old rags in the dryer. Then, run it on high heat for about five minutes to soften the residue. Use a blunt-edged plastic knife or an old credit card to scrape away the softened wax gently. Dampen a microfiber cloth with distilled white vinegar or rubbing alcohol and scrub each affected area. Switch to a clean cloth area to avoid smearing. Finally, wipe the drum with a microfiber cloth dampened with warm water. Let it air-dry for 30 minutes before using the dryer again.
Lipstick
Sometimes, bad things happen. Just take take a breath. Then, with a soft, dry cloth, wipe away as much lipstick as possible. Do it while the dryer is still warm.
It’s important to sanitise the dryer drum if it was used to dry clothes exposed to pesticides, chemicals or poison ivy residue. Wipe it down with a sanitising solution. You can make the sanitising solution at home by mixing 1/4 cup of bleach with a quart of water. If you prefer to avoid using bleach, you can opt for pine oil, phenolic disinfectant, or quaternary disinfectant instead. And again – always wear your protective gear while sanitising the dryer! Rinse the drum thoroughly with plain water and run a short dryer cycle with damp towels to prevent bleach spotting.
Smelly tumble dryer? Vinegar works wonders on dryers that smell. It is the perfect odour neutraliser. Prepare a solution with one part vinegar and two parts warm water. Use this mixture to thoroughly clean the drum.
Step 5. Clean the dryer vent
A clean dryer vent is essential to keeping your home safe and efficient. Lint, dust, and debris can accumulate in the vent. They reduce dryer performance and raise fire risks. Keep your dryer vent clean to prevent these hazards. That way, it will run more efficiently, saving energy and extending its lifespan. Here’s how to properly clean your dryer vent so your home appliance care routine keeps your dryer working at its best.
- Pull out the dryer to access vent duct
Start by removing the dryer from the wall (after you have already turned off the gas valve too). Leaving one foot of space between the back of the dryer and the wall will make it easier to clean it out. You can ask for help when moving the dryer to keep yourself and the dryer safe.
- Detach the exhaust hose
Unscrew the vent clamps or remove the vent from the back of the dryer. A screwdriver will be very handy for that purpose. Once the clamp is loose, slide the hose off and slide the dryer further out of the way.
- Clean the hose
Vacuum out any debris, dust or lint left on the hose. Or use a clean toilet bowl brush to scrub the hose instead of a vacuum cleaner.
Important: Do not use a coat hanger or anything pointy to scrape the inside of the hose. It can puncture the hose! - Clean the vent on the wall
The flexible hose section connects the dryer to the wall, and from there, a tube allows the exhaust to pass to the outdoors. This area often clogs with lint and debris and needs regular cleaning. Wrap a towel around a broomstick or piece of wood, then insert it into the mouth of the vent. Move the towel around to remove any immediate blockages and loosen lint inside the tube. Finally, look into the tube to check for any obstructions blocking the exhaust passage to the outdoors.
- Inspect and clean the exterior vent
Clean the outside vent by removing the exhaust vent cover on the exterior of your house. This decorative cover prevents lint and debris from escaping the tubing. It is usually located near the roof. Open the vent cover and remove large pieces of lint with your hand. Use a broomstick and towel to scrub excess lint from the inside of the exhaust exit and knock out any obstructions you may notice. You can use a dryer cleaning brush along the inside of the ductwork and remove remaining lint and debris with a vacuum hose. Lastly, check the vent to ensure it opens and closes properly. If not, lint can become trapped and cause odours or a fire hazard.
- Reassemble the components
Then, go back inside and re-clamp or re-tape the venting to the back. Reconnect your dryer. Now, turn back on the gas valve if it’s a gas dryer.
Important: When cleaning a gas dryer, it’s an absolute must to use a non-flammable cleaner – which means no vinegar.
For optimal dryer performance and safety, consider enlisting professional help. Regular cleaning includes dryer cleaning. Moreover, professionals will ensure that all lint and debris are thoroughly removed from hard-to-reach areas, significantly reducing fire hazards and enhancing your dryer’s efficiency.
Step 6. Additional maintenance considerations
When it comes to dryer maintenance, there are additional considerations beyond just cleaning the lint trap and vent. Inspecting the dryer’s seals and gaskets, especially the door seals, is really important. Seals keep heat from escaping during drying, keeping the dryer efficient. Regular inspection is necessary to check for signs of wear or damage that could compromise their effectiveness. A damaged seal can cause energy loss and lower dryer performance, causing longer drying times and higher energy bills.
To ensure you know how to clean a dryer effectively, it’s crucial to pay special attention to the exhaust vents. These vents play a crucial role in expelling hot, moist air outside. Over time, lint and debris can build up over time, restricting airflow and raising the risk of fires. Regular inspection and cleaning of these vents are essential to maintain clear airflow. Installing a vent cover with a lint trap can help prevent excess lint accumulation.
Obviously, there are some things you shouldn’t ever dry. Do you know what they are? If not, let me tell you – bras, workout gear, and swimwear. High temperatures can destroy the material, making your clothes unusable and incapable of regaining their initial shape.
Another scenario is socks or some small clothes are stuck in the mechanical parts of the dryer. Don’t do it yourself. Contact an appliance repairman to take the dryer apart.
How often should your dryer get cleaned?
Each part of your dryer needs its own maintenance schedule. You can keep an eye on residue and lint build-up on your dryer’s exterior, drum, and lint trap so you know when to clean it. Regular cleaning extends appliance longevity. Moreover, it also contributes to home safety by reducing the risk of lint fires. Run your hand along the sides and inside of the drum to feel for residue. Depending on your dryer, some parts need cleaning more frequently, like the vents and lint trap. DIY upkeep of these components ensures optimal performance and safety. Remember to consider how often to clean your dryer based on its usage and manufacturer recommendations to maintain its efficiency and safety standards.
Here is an example timetable for cleaning the different parts of your dryer:
- After every load – Clean the dryer lint screen. Lint on a screen can make it take longer to dry. It might seem like a lot of work, but wet lint drives everyone crazy. Avoid scrubbing or using water to remove wet lint.
- Once a month – Clean the exterior and interior of your dryer. Even if there are no stains to remove on the inside, cleaning will prevent odours and residue buildup. Outside cleaning will keep dust, detergent spills, and other buildup at bay.
- Every three-six months – Deep clean the lint trap. Especially in gas dryers, built-up lint can cause a fire.
- Once a year – Clean the dryer vent and ducts. It will prevent lint build-up from obstructing airflow and worsening your dryer’s performance. Clean it more often if you notice your dryer isn’t drying your clothes.
Takeaways
- For optimal performance and home safety, make it a habit to regularly clean your dryer inside and out. Neglecting maintenance can result in longer drying times, reduced appliance efficiency, and increased fire hazards.
- Preventive maintenance extends the lifespan of your dryer. As a bonus, it reduces energy consumption and keeps repairs to a minimum.
- Proper cleaning techniques are essential. Clear the lint trap after each use and periodically deep clean the vents and ducts to maintain airflow and prevent lint fires.
- While DIY upkeep of the lint trap and exterior surfaces is important for performance and safety, consider seeking professional help for thorough cleaning and maintenance periodically.
Want us to clean your dryer?
Our professionals will take care of the safety and efficiency of your dryer to safeguard your home and maximise appliance longevity.