Last update: 3 years ago

Floating timber floors are a beautiful and an easy to install solution for your home, but it requires taking proper care of it. Regular cleaning and maintenance will make the floor looks good and shiny and will prolong the life of the floor.
What are floating timber floors made of?
A floating timber floor is a floor that does not need to be nailed, or glued to a subfloor. The floorboards are attached to one another and are fitted over an existing floor like concrete, tiles or terracotta. In order to attach the floating floorboards, the subfloor should be hard and perfectly level.
Floating floors are flexible. They accommodate any movement and pressure and spread out evenly to reduce gaps and cracks. When installing there is usually a gap left between the walls and the floating floor to allow expansion of the timber boards. The gap is usually covered with skirting boards or mouldings.
Floating timber floors are affordable and a cheaper option compared to structural timber floors. They are easier to install and you can even do it by yourself.
There are two types of floating timber floors – real floors and imitation of timber floating floors. Real timber floating floors are made from attaching layers of hard and softwood to a fibreboards substrate. The timber floor can be sanded if you want to achieve a different look but this can only be done limited times as the layer of real wood is thin and you can remove it if you sand it over and over again.
The imitation of a floating timber floor is made from a laminate attached to a substrate. The laminate is designed and printed to look like timber, but without maintenance issues.
Step-by-step floating timber floorboards cleaning
Floating wood floors are protected with a sealant that allows water cleaning and mopping. Despite that, floating floors are usually laid over other subfloors and if you damp the floor often, the liquid may slip into the boards and damage the surface underneath it, causing warping, mould and cracks. That’s why you need to be extra careful when cleaning a floating timber floor.
Here is a step-by-step procedure for cleaning a floating floor:
Step 1: Vacuum the floating floor regularly
Vacuum and sweep the floor regularly. Focus on high-traffic areas to prevent dust and dirt from accumulating. You can use a vacuum cleaner with an attachment for hardwood floors. A vacuum cleaner will also help you to remove the dust from the corners of the room. When sweeping use a broom or dust mop with softer fibres to avoid damaging the floor.
Step 2: Spot clean stains from the floating floor
Remove spills from the floor as soon as they happen. Use a dry microfiber cloth to remove liquids.
Spot treat stains with a mild cleanser and a damp cloth as soon as you can. You can use rubbing alcohol for stubborn stains. Avoid scrubbing the area, rather tap the spot with the cloth and remove it gently from the surface. Do not use harsh chemicals that can damage the wooden floor.
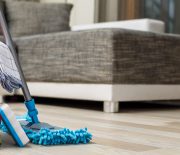
Step 3: Mop the floating floor
After treating the stains and removing all the dust from the floor, it’s time for moping. Don’t overflood the floor with water. Use a sponge mop, rather than a classic wire-wound mop, to avoid spreading water around the floor. Use hot water and a cleaning detergent and wipe up the whole floor.
Step 4: Leave the floating floor to dry
After finishing cleaning open the windows and doors if possible and leave the floor to air dry. Over time, the floor may lose its shiny look mostly in the high-traffic areas in your home. To restore and enhance its shine, use a timber refresher.
How to protect the floating wood floor
Floating floors are natural products. It’s inevitable to get damaged over time, scratches and dents may appear in high traffic areas and under the furniture.
To prolong their life you can place carpets or pads under heavy furniture like sofas and beds and under furniture that you move often like chairs and tables to avoid scratching the floor underneath them.
Place doormats by your house’s entrances to prevent dirt, dust, sand, asphalt and oils from being tracked onto the floor and protect your floor from getting scratched from sand and little rocks. Just remember to have your mats cleaned, too.
Certified Green Cleaning, a top Canadian janitorial company, stresses that you must not get the timber floors too wet during cleaning. When the timber becomes oversaturated with water, it can swell and cause long-term damage to the floor. Always make sure to wring the mop out thoroughly before you begin to clean a floating wood floor.
DO’s of floating floorboards cleaning
- Clean spills as soon as they happen with a dry mop.
- Sweep the floor daily to remove dirt and dust.
- Use cleaning detergent specifically made for laminate and wood floors.
- Keep the floors dry, especially in humid weather.
- Maintain indoor humidity relatively at 35-40%.
- Sand the floor if necessary but avoid doing it more than once, to prevent damaging the natural wood on the floor.
- Trim your pet’s nails to avoid scratching the floor surface.
DON’Ts of floating floorboards cleaning
- Painting over the floating floor.
- Using steam mops on laminate flooring. The moist from the steam mop may damage the floor permanently.
- Using harsh cleaning detergents such as bleach, chlorine and acids.
- Scrubbing the floating floor with metal brushes.
- Waxing the floor.
- Using baking soda and vinegar as a cleaning solution.
- Leave wet carpets and rugs on the floating floor.
Do you need a helping hand?
Hire a professional cleaning team!